Artikel After Effects,
Artikel Color grading,
Artikel Compositing,
Artikel Featured,
Artikel qp Grade Assistant,
 [ #AfterEffects #compositing ]
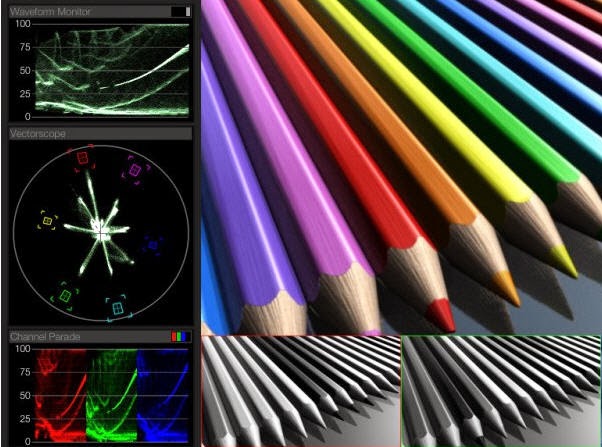
qp Grade Assistant 2 provides the next generation of scopes and monitoring for compositing and grading in After Effects.
Key Features:
Five scopes: - Waveform monitor (Luma, and RGB views)
- NEW! Vectorscope, including Hue Vectors graticule designed by grading guru Alexis Hurkman
- Channel Parade (RGB and YCbCr views)
- Slice Waveform (Luma, and RGB views)
- NEW! Histogram (Luma, and RGB views)
Five monitor layouts: - Full-screen single
- Four-way split
- Four-way classic
- Windowed (resize and move anywhere on screen)
- Off (scopes only)
Fully customisable interface - use only the scopes you need for the job, and place them anywhere on screen
Three scope sampling levels - High (1:1), Medium (1:2) and Low (1:4) for optimum performance whatever your hardware
Alpha and Luma monitoring in the primary monitor; YCbCr monitoring added to four-way set-ups
Plus all the great features from the original plugin:
- Compare with original (or alternative) layer
- Gamma (and now Gain) controls for checking black and white levels
Instructions:
- Create a new adjustment layer above your source layer and apply qp Grade Assistant 2 (hint: the plugin works best on an adjustment layer at the top of the stack. In this new version, the plugin will automatically switch to Guide Layer mode if applied to an adjustment layer to avoid it accidentally rendering)
- By default, qp Grade Assistant 2 shows the classic four-way split with RGB channels beneath the primary monitor, and the Waveform Monitor, Vectorscope and Channel Parade stacked on the left-hand side of the window
- Turn scopes on and off using the checkboxes. Controls for hidden scopes are also hidden from the Effect Controls panel
- Alternative monitor layouts are chosen from the dropdown list at the top of the effect's controls
- Scopes (and the monitor in "Windowed" mode) can be resized and moved anywhere on screen. You can also do this directly in the Comp Viewer by dragging the scopes as if they were sub-windows
- Perform colour correction on your source layer, or on a further adjustment layer below the qp Grade Assistant layer
- To see a before/after comparison, select the source layer from the "Original Source" dropdown and use the "Compare with Original" slider. Alternatively use the handle to interactively drag the comparison bar in the Comp Viewer, Nuke style
- To mix between the before view and the graded view, use the "Compare Opacity" slider (or drag down the comparison handle in the Comp Viewer)
- Use the Slice Waveform to check individual RGB and/or luma levels for a given row of pixels
- For colour matching of CG or other composited elements, apply qp Grade Assistant 2 as normal and use the RGB channel views in "Four Way Split" or "Four Way Classic" monitor modes as you tweak RGB levels
- Use the Gamma and Gain sliders to "slam" your comp and check black/white levels. These sliders also affect the Alpha and Luma "Primary Monitor View" modes - especially useful for finding small holes in keyed mattes
Advanced Tips:
- In 32-bit float mode, if you see a small red exclamation mark (!) in the title bar of the Waveform Monitor, Slice Waveform or Channel Parade, your comp has superbright values. Use the "Max Waveform Scale" slider in the options to reveal values above 100%
- Most scopes have the ability to display different channels (accessed via a dropdown). The small colour swatch in the top right of each scope (except the Vectorscope) shows which channels are currently being displayed
- The Channel Parade echoes the channels selected in the "View Channels" dropdown that controls which channels are shown in the four way monitor modes (either RGB or YCbCr)
- qp Grade Assistant 2 will happily play back during a RAM preview. However to speed things up, you can choose to "Mute Active Scopes", which turns off the sampling and rendering of the scopes, instead drawing a red diagonal line through each scope
- By default, qp Grade Assistant 2 will lock its layer's position using an expression in order to prevent the layer being moved accidentally (for example trying to move a scope without first selecting the effect in the Effect Control panel). Feel free to turn this on and off using the "Lock Layer" checkbox at the bottom of the effect's controls
Download
qp Grade Assistant 2 for After Effects costs $79.00 with Special Intro 20% off until March 24, 2014
here More After Effects Plugin
[ #AfterEffects #compositing ]qp Grade Assistant 2 provides the next generation of scopes and monitoring for compositing and grading in After Effects.
Key Features:
Five scopes: - Waveform monitor (Luma, and RGB views)
- NEW! Vectorscope, including Hue Vectors graticule designed by grading guru Alexis Hurkman
- Channel Parade (RGB and YCbCr views)
- Slice Waveform (Luma, and RGB views)
- NEW! Histogram (Luma, and RGB views)
Five monitor layouts: - Full-screen single
- Four-way split
- Four-way classic
- Windowed (resize and move anywhere on screen)
- Off (scopes only)
Fully customisable interface - use only the scopes you need for the job, and place them anywhere on screen
Three scope sampling levels - High (1:1), Medium (1:2) and Low (1:4) for optimum performance whatever your hardware
Alpha and Luma monitoring in the primary monitor; YCbCr monitoring added to four-way set-ups
Plus all the great features from the original plugin:
- Compare with original (or alternative) layer
- Gamma (and now Gain) controls for checking black and white levels
Instructions:
- Create a new adjustment layer above your source layer and apply qp Grade Assistant 2 (hint: the plugin works best on an adjustment layer at the top of the stack. In this new version, the plugin will automatically switch to Guide Layer mode if applied to an adjustment layer to avoid it accidentally rendering)
- By default, qp Grade Assistant 2 shows the classic four-way split with RGB channels beneath the primary monitor, and the Waveform Monitor, Vectorscope and Channel Parade stacked on the left-hand side of the window
- Turn scopes on and off using the checkboxes. Controls for hidden scopes are also hidden from the Effect Controls panel
- Alternative monitor layouts are chosen from the dropdown list at the top of the effect's controls
- Scopes (and the monitor in "Windowed" mode) can be resized and moved anywhere on screen. You can also do this directly in the Comp Viewer by dragging the scopes as if they were sub-windows
- Perform colour correction on your source layer, or on a further adjustment layer below the qp Grade Assistant layer
- To see a before/after comparison, select the source layer from the "Original Source" dropdown and use the "Compare with Original" slider. Alternatively use the handle to interactively drag the comparison bar in the Comp Viewer, Nuke style
- To mix between the before view and the graded view, use the "Compare Opacity" slider (or drag down the comparison handle in the Comp Viewer)
- Use the Slice Waveform to check individual RGB and/or luma levels for a given row of pixels
- For colour matching of CG or other composited elements, apply qp Grade Assistant 2 as normal and use the RGB channel views in "Four Way Split" or "Four Way Classic" monitor modes as you tweak RGB levels
- Use the Gamma and Gain sliders to "slam" your comp and check black/white levels. These sliders also affect the Alpha and Luma "Primary Monitor View" modes - especially useful for finding small holes in keyed mattes
Advanced Tips:
- In 32-bit float mode, if you see a small red exclamation mark (!) in the title bar of the Waveform Monitor, Slice Waveform or Channel Parade, your comp has superbright values. Use the "Max Waveform Scale" slider in the options to reveal values above 100%
- Most scopes have the ability to display different channels (accessed via a dropdown). The small colour swatch in the top right of each scope (except the Vectorscope) shows which channels are currently being displayed
- The Channel Parade echoes the channels selected in the "View Channels" dropdown that controls which channels are shown in the four way monitor modes (either RGB or YCbCr)
- qp Grade Assistant 2 will happily play back during a RAM preview. However to speed things up, you can choose to "Mute Active Scopes", which turns off the sampling and rendering of the scopes, instead drawing a red diagonal line through each scope
- By default, qp Grade Assistant 2 will lock its layer's position using an expression in order to prevent the layer being moved accidentally (for example trying to move a scope without first selecting the effect in the Effect Control panel). Feel free to turn this on and off using the "Lock Layer" checkbox at the bottom of the effect's controls
Download
qp Grade Assistant 2 for After Effects costs $79.00 with Special Intro 20% off until March 24, 2014
here More After Effects Plugin